Wallets
This section describes all the necessary steps for integrating the payment flow with Apple Pay and Google Pay wallets.
Marlim's partner for SDK integration with Android devices (Google Pay) and iOS devices (Apple Pay) is Yuno and will be the library responsible for orchestrating the entire payment process. We will discuss more about installing this package in your application for each platform in the following sections.
One of the significant changes between wallet payments and traditional transactions is in the response format, which can be both synchronous and asynchronous. In the case of wallets, transactions introduce a new synchronous status SENT, while the final transaction status update occurs asynchronously via webhook, indicating whether the payment was completed successfully or not.
1. Generating a session
To create a transaction with a Wallet, you will first need to create a Session.
Request Body Params
| Property | Type | Description |
|---|---|---|
| amount | int32 | Final amount to be charged with fees. Must be passed in cents. |
| item_id | string | Transaction ID on your platform. This ID is important because it will be used both in session creation and in the transaction creation stage. |
| customer | object | Customer object. |
| customer[name] | string | Customer name. |
| customer[email] | string | Customer email. |
| customer[document_number] | string | Customer document number. |
| customer[phone] | object | Customer phone number object. |
| customer[phone][country_code] | string | Customer phone country code (DDI), for example: +55. |
| customer[phone][area_code] | string | Customer phone area code (DDD). |
| customer[phone][number] | string | Customer phone number. |
| customer[address] | object | Customer address object. |
| customer[address][country] | string | Customer nationality in country code format. Only ISO 3166-1 alpha-2 (two-letter) format will be accepted. Ex: BR, US, UY... Maximum characters: 2 |
| customer[address][state] | string | Customer current address state, in State Code format. Ex: SP, RJ, MG... Maximum characters: 2 |
| customer[address][city] | string | Customer address city. Maximum characters: 50 |
| customer[address][neighborhood] | string | Customer address neighborhood. Maximum characters: 45 |
| customer[address][street] | string | Customer address street. Maximum characters: 54 |
| customer[address][number] | string | Customer address number. Maximum characters: 5 |
| customer[address][complement] | string | Optional parameter for the customer address complement. Maximum characters: 30 |
| customer[address][zipcode] | string | ZIP Code (domestic customers) or ZIP (foreign customers). Maximum characters: 9 |
| Property | Type | Description |
|---|---|---|
session_id | string | Session ID that will be used in the checkout stage in the SDK application, so it is important to store it. |
{
  "amount": 100000,
  "item_id": "a4fe84db-bfaf-4fc0-a345-c6bc53cb5d4a",
  "customer": {
    "name": "John Silva",
    "email": "john@silva.com.br",
    "document_number": "11122233344",
    "phone": {
      "country_code": "+55",
      "area_code": "11",
      "number": "998765432"
    },
    "address": {
      "country": "BR",
      "state": "SP",
      "city": "Sao Paulo",
      "neighborhood": "Downtown",
      "street": "Main Street",
      "number": "123",
      "complement": "Apt 12",
      "zipcode": "01122033"
    }
  }
}
Response Object
{
  "session_id": "886eb109-4149-41c3-8f2f-6c85545bda21"
}
Payment Methods
In the next web and device integration sections, you will need to add the payment_type chosen by the user. The available payment types are: GOOGLE_PAY or APPLE_PAY and must be filled exactly as described.
2. Web Integration
For web integrations, the frontend must first obtain a session_id through your backend and then initialize the Yuno checkout with that identifier. For session creation, see Generating a session.
For web integrations, use Yuno full checkout with mountCheckout() and mountExternalButtons(). The mountCheckoutLite() flow does not cover Apple Pay and Google Pay for this scenario.
Official references:
2.1 Installation and environment variables
You can integrate the Yuno Web SDK in two ways:
Option 1: npmnpm install @yuno-payments/sdk-web
If your project uses TypeScript, Yuno also provides typings:
npm install -D @yuno-payments/sdk-web-types
<script src="https://sdk-web.y.uno/v1.6/main.js"></script>
An example set of environment variables for this flow:
NEXT_PUBLIC_YUNO_SDK_KEY
MARLIM_URL
API_KEY
Your API_KEY and NEXT_PUBLIC_YUNO_SDK_KEY must be requested from our Support or Development team.
2.2 Session creation
Session creation must be handled server-side through an intermediate route so the Marlim key stays protected in the backend.
For accepted fields, payload examples, and response shape, see Generating a session.
2.3 SDK initialization and button mounting
The SDK can be loaded with loadScript() and initialized once before any transaction:
'use client'

import { loadScript } from '@yuno-payments/sdk-web'

const Yuno = await loadScript()
const yuno = await Yuno.initialize(process.env.NEXT_PUBLIC_YUNO_SDK_KEY!)
With the Marlim session_id, the frontend must:
- Call
startCheckout()with thecheckoutSession.
await yuno.startCheckout({
  checkoutSession: session_id,
  elementSelector: '#root',
  countryCode: 'BR',
  language: 'en',
})
- Then call
mountCheckout()to initialize the web checkout.
await yuno.mountCheckout()
- Next, mount Google Pay with
mountExternalButtons()in a separate element.
await yuno.mountExternalButtons([
  {
    paymentMethodType: 'GOOGLE_PAY',
    elementSelector: '#google-pay-button',
    checkoutSession: session_id,
  },
])
- Capture the selected method through
yunoPaymentMethodSelected.
yunoPaymentMethodSelected(data: { paymentMethodType?: 'GOOGLE_PAY' }) {
  paymentType = data.paymentMethodType
}
- In the
yunoCreatePaymentcallback, sendoneTimeToken,paymentType, and the order identifier to the backend.
async yunoCreatePayment(oneTimeToken: string)
- After the transaction is successfully created, call
continuePayment().
await yuno.continuePayment({ showPaymentStatus: true })
2.4 Transaction creation
When Yuno returns the oneTimeToken, the backend must build the transaction payload and call Marlim.
For the full payload, accepted fields, and response, see wallet/transaction.
On the backend, those fields are converted to the Marlim format, mainly:
-
wallet.payment_type -
wallet.ott -
wallet.session_id
2.5 Browser compatibility
| Payment method | Browser | Requirement |
|---|---|---|
| Google Pay | Chrome, Edge, Firefox and others | Google account with a saved card |
3. Device Integration
3.1 Android (Google Pay)
Prerequisites
To use the Yuno Android SDK, you need to meet the following system requirements:
- The Yuno Android SDK requires your minSdkVersion to be 21 or higher
- Your project must have Java 8 enabled and use AndroidX instead of older support libraries
- The android-gradle-plugin version must be 4.0.0 or higher
- The Proguard version must be 6.2.2 or higher
- The kotlin-gradle-plugin version must be 1.4.0 or higher
SDK Installation
Step 1: Include the library in your project
Make sure the Yuno SDK file is included in your project through Gradle. Then, add the repository source using the following line of code:
maven { url "https://yunopayments.jfrog.io/artifactory/snapshots-libs-release" }
After that, include the code below in the build.gradle file to add the Yuno SDK dependency to the application.
dependencies {
    implementation 'com.yuno.payments:android-sdk:{last_version}'
}
Permissions
Yuno SDK includes, by default, the INTERNET permission, which is necessary to make network requests.
<uses-permission android:name="android.permission.INTERNET" />
Required Imports
import com.yuno.payments.features.payment.startCheckout;
import com.yuno.payments.features.payment.startPaymentLite;
import com.yuno.payments.features.payment.ui.views.PaymentSelected;
import com.yuno.payments.features.payment.continuePayment;
Step 2: Initialize the SDK with the public key
If you haven't implemented a custom application, create one. In the onCreate() of your application class, call the initialization function (Yuno.initialize) as shown in the example below:
class CustomApplication : Application() {
  override fun onCreate() {
    super.onCreate()
    Yuno.initialize(
      this,
      "public_key",
      config: YunoConfig,
    )
  }
}
Marlim's Development or Support team will provide 2 keys (public_key), one for production environment and another for staging environment.
Use the YunoConfig data class to customize the SDK behavior. Include this configuration in Yuno.initialize:
data class YunoConfig(
    val language: YunoLanguage? = null,
    val isDynamicViewEnabled: Boolean = false,
)
In the table below you will find the descriptions of each available customization option.
| Customization Option | Description |
|---|---|
| language | Set the language used to present the SDK. If you don't send or provide a null value, the Yuno SDK will use the device language. Available options are:ENGLISH, SPANISH, PORTUGUESE, INDONESIAN and MALAY. |
| isDynamicViewEnabled | Defines whether you want to use dynamic view. If you don't provide a value, the Yuno SDK will use FALSE as the option. |
Step 3: Start the checkout process
To start a new payment process with the SDK, you need to call the startCheckout method in the onCreate of the activity that calls the SDK, this is where you will use the session_id generated in the previous step.
startCheckout(
  checkoutSession: "session_id",
  countryCode: "BR",
  callbackPaymentState: ((String?) -> Unit)?
)
| Property | Meaning |
|---|---|
| callbackPaymentState | It's a function that returns the current payment process. Possible values: SUCCEEDED, FAIL, PROCESSING, REJECT, INTERNAL_ERROR and CANCELED |
Step 4: Start the payment process
To start a payment process, you must call the startPaymentLite method
startPaymentLite(
    paymentSelected: PaymentSelected,
    callbackOTT:(String?) -> Unit,
    showPaymentStatus: Boolean,
)

PaymentSelected(
    type : String "payment_type",
)
Below is the description of the parameters needed to start the payment.
| Property | Meaning |
|---|---|
| paymentSelected | Payment type selected by the user. Possible values GOOGLE_PAY or APPLE_PAY. |
| callbackOTT | A required function that returns the updated One Time Token (OTT), necessary to complete the payment process, which will be used to be sent to the Transactions endpoint. |
| showPaymentStatus | A boolean that specifies whether the payment status should be displayed in the interface. |
3.2 iOS (Apple Pay)
Prerequisites
To use the Yuno iOS SDK, you need to meet the following system requirements:
- Add CocoaPods or Swift Package Manager to your project
- Use iOS version 14.0 or higher
A few more steps are required that must be completed in the Apple Developer Panel in your account, described below.
Step 1: Create a merchant identifier
In the Apple Developer panel, register a merchant identifier following the steps:
- Log in to the Apple Developer
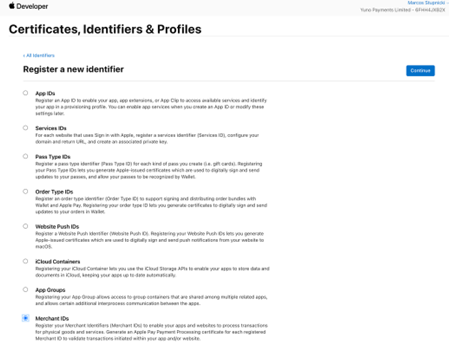
- In Certificates, Identifiers and Profiles, select Register a new identifier
- Select Merchant IDs and click Continue
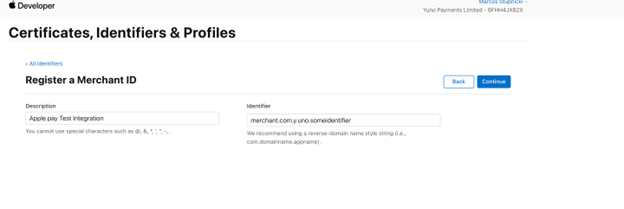
- Add a Description to describe the merchant you are registering, such as Apple Pay Integration. For the Identifier, type the prefix
merchant.com.y.uno.yourapp - Click Continue
Step 2: Create a payment processing certificate
To start, create a new directory (for example, Downloads/ApplePayFiles) to store the files needed to generate certificates. You should save certificates and other Apple Pay files during the process.
To create a PaymentProcessingCertificate on your MacOS, follow the steps presented below:
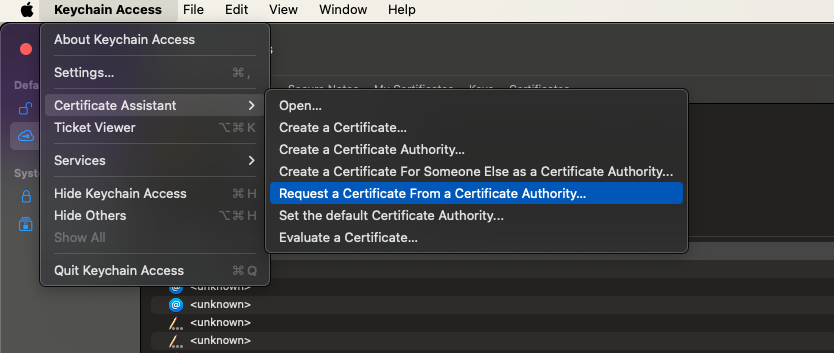
- Open Keychain Access on your MacOS
- In the Keychain Access application, Keychain Access > Certificate Assistant > Request a Certificate from a Certificate Authority
- Fill in the certificate information according to the following instructions:
- Email Address: Enter your email address
- Name: Enter a name for the private key (for example, ProcessingCertificate)
- CA Email Address: Leave this field blank
- Select Saved to disk
- Select Let me specify key pair information
- Click Continue
- For the key pair, use the following settings:
- Key Size: 256 bits
- Algorithm: ECC
- Save the CSR with the name
CertificateSigningRequestPaymentProcessingCertificate.certSigningRequestin the previously created directory - Click Continue to finish creating the CSR
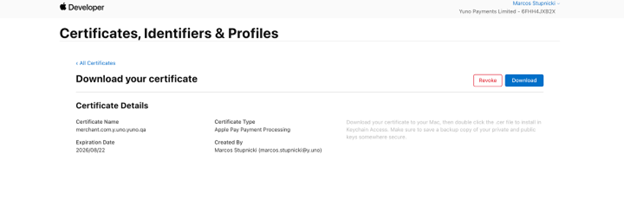
Step 3: Get the payment processing certificate
After creating the CSR, you need to obtain and convert the certificate. Follow the steps:
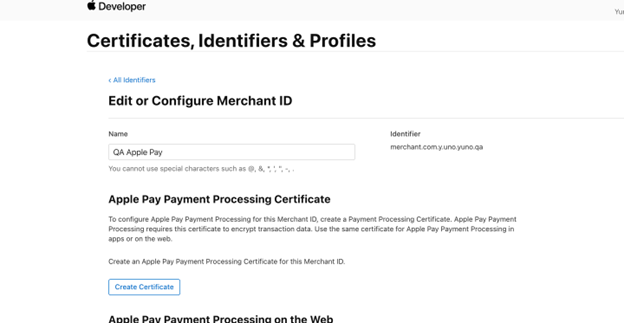
- Access the Apple Developer portal
- Select your merchant ID and click Create Certificate in Apple Pay Payment Processing Certificate
- For Will payments associated with this Merchant ID be processed exclusively in China mainland?, select No
- Click Upload a Certificate Signing Request, and select the previously created CSR named
CertificateSigningRequestPaymentProcessingCertificate.certSigningRequest, and click Continue - Download the signed certificate (
apple_pay.cer) from Apple and save it in the previously created directory (Downloads/ApplePayFiles) - Convert the certificate using the following command:
openssl x509 -inform DER -in apple_pay.cer -out apple_pay.pem
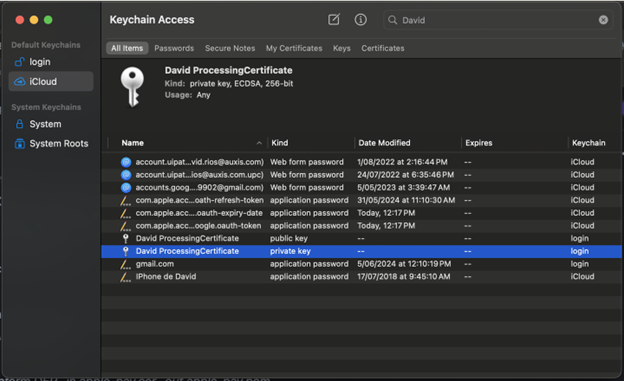
Step 4: Export private key information
- Access Keychain Access on your computer
- Locate the entry created earlier in Step 2 (for example, ProcessingCertificate)
- Right-click and export the private key in
.p12format (example,ProcessingCertificate.p12) - Set a password (for example, ApplePayWallet) and save it in the previously created directory. You will need to provide your computer password to export the
.p12 - After exporting, we need to convert the private key. Access the directory where you saved the private key, open the terminal and run the following command:
openssl pkcs12 -in ProcessingCertificate.p12 -nocerts -nodes | sed -ne '/-BEGIN PRIVATE KEY-/,/-END PRIVATE KEY-/p' > ProcessingCertificatePrivateKey.pem
The private key content will be available in the ProcessingCertificatePrivateKey.pem file.
Step 5: Create a merchant identity certificate
To create a MerchantIdentityCertificate on your MacOS, follow the steps presented below:
- Open Keychain Access on your MacOS
- In the Keychain Access application, Keychain Access > Certificate Assistant > Request a Certificate from a Certificate Authority
- Fill in the certificate information according to the following instructions:
- Email Address: Enter your email address
- Name: Enter a name for the private key (for example,
MerchantIdentityCertificate) - CA Email Address: Leave this field blank
- Select Saved to disk
- Select Let me specify key pair information
- Click Continue
- For the key pair, use the following settings:
- Key Size: 2048 bits
- Algorithm: RSA
- Save the CSR with the name
CertificateSigningRequestMerchantIdentityCertificate.certSigningRequestin the previously created directory (Downloads/ApplePayFiles) - Click Continue to finish creating the CSR
Step 6: Get the merchant identity certificate
After creating the CSR, you need to obtain and convert the certificate. Follow the steps:
- Access the Apple Developer portal in Identifiers
- Select your merchant ID
- In Apple Pay Merchant Identity Certificate click Create Certificate
- Click Upload a Certificate Signing Request and select the certificate created in Step 5 (
CertificateSigningRequestMerchantIdentityCertificate.certSigningRequest) - Click Continue
- Download the signed certificate (
merchant_id.cer) from Apple and save it in the created directory (Downloads/ApplePayFiles) - Access the directory where you saved the certificate, open the terminal and run the following command to convert it to the required format:

openssl x509 -inform DER -in merchant_id.cer -out merchant_id.pem
Step 7: Export merchant private key
- Access Keychain Access on your computer
- Locate the entry created earlier in Step 5 (for example,
MerchantIdentityCertificate) - Right-click and export the private key in
.p12format (example,MerchantIdentityCertificate.p12) - Set a password (for example, ApplePayWallet) and save it in the previously created directory (
Downloads/ApplePayFiles). You will need to provide your computer password to export the.p12 - After exporting, we need to convert the private key. Access the directory where you saved the private key, open the terminal and run the following command:
openssl pkcs12 -in MerchantIdentityCertificate.p12 -nocerts -nodes | sed -ne '/-BEGIN PRIVATE KEY-/,/-END PRIVATE KEY-/p' > MerchantIdentityCertificatePrivateKey.pem
The private key content will be available in the MerchantIdentityCertificatePrivateKey.pem file.
Step 8: Register merchant domains
As a final step, you need to register the merchant domains in the Apple Dashboard. Follow the steps below to complete the process:
- Access the Apple Developer portal in Identifiers
- Select your Merchant ID and click Add Domain in Merchant Domains
- Enter the domain (for example, yourapp.com) and click Save
After completing all the steps described above, you should send to Marlim the ApplePayFiles.zip folder with all the files generated in the previous steps.
Marlim will configure the necessary access with the Acquirer/Apple and release the iOS SDK integration for your team.
SDK Installation
Step 1: Include the library in your project
You can add the library using CocoaPods or Swift Package Manager.
CocoaPodsTo add the Yuno SDK to your iOS project, you need to install the Yuno SDK. If you don't have a Podfile, follow the CocoaPods guide to create one. After creating the Podfile, you will integrate the Yuno SDK to Cocoapods by adding the line below to your Podfile.
pod 'YunoSDK', '~> 1.1.22'
Then, you need to run the installation:
pod install
To add the Yuno SDK to your iOS project, you need to install the Swift Package Manager. With the Swift package configured, add Yuno SDK as a dependency, as presented in the following code block:
dependencies: [
    .package(url: "https://github.com/yuno-payments/yuno-sdk-ios.git", .upToNextMajor(from: "1.1.17"))
]
4. Start a Transaction
After completing the steps described earlier, you will have new fields that must be sent to the dedicated endpoint for wallet transactions: wallet/transaction
Request Body Params
| Property | Type | Description |
|---|---|---|
| net_value | int32 | Net amount to be received for the transaction. Must be passed in cents. |
| amount | int32 | Final amount to be charged to the payer customer. Must be passed in cents. |
| installments | string | Number of transaction installments, with minimum: 1 and maximum: 12. |
| item_id | string | Transaction ID on your platform. |
| dfp_id | string | Optional parameter for the URL ID that composes the session_id created in Marlim's Anti-Fraud integration. |
| customer | object | Customer object. |
| customer[name] | string | Customer name. |
| customer[email] | string | Customer email. |
| customer[document_number] | string | Customer document number. |
| customer[phone] | object | Customer phone number object. |
| customer[phone][country_code] | string | Customer phone country code (DDI), for example: +55. |
| customer[phone][area_code] | string | Customer phone area code (DDD). |
| customer[phone][number] | string | Customer phone number. |
| customer[address] | object | Customer address object. |
| customer[address][country] | string | Customer nationality in country code format. Only ISO 3166-1 alpha-2 (two-letter) format will be accepted. Ex: BR, US, UY... Maximum characters: 2 |
| customer[address][state] | string | Customer address state, in state code format. Ex: SP, RJ, MG... Maximum characters: 2 |
| customer[address][city] | string | Customer address city. Maximum characters: 50 |
| customer[address][neighborhood] | string | Customer address neighborhood. Maximum characters: 45 |
| customer[address][street] | string | Customer address street. Maximum characters: 54 |
| customer[address][number] | string | Customer address number. Maximum characters: 5 |
| customer[address][complement] | string | Optional parameter for the customer address complement. Maximum characters: 30 |
| customer[address][zipcode] | string | ZIP Code (domestic customers) or ZIP (foreign customers). Maximum characters: 9 |
| soft_descriptor | string | Description that will appear on your customer's invoice. Maximum 13 characters, using alphanumeric characters and spaces. |
| wallet | object | Object with the selected wallet data. |
| wallet[payment_type] | string | Payment type selected by the user. Accepted values: GOOGLE_PAY or APPLE_PAY. |
| wallet[ott] | string | One Time Token (OTT) generated by the Yuno SDK and received in the callbackOTT. |
| wallet[session_id] | string | Session ID generated in the session creation step. |
| webhook_url | string | Endpoint of your system that will receive information for each transaction update. |
| webhook_auth_token | string | Optional parameter to authenticate notifications sent to webhook_url. If the parameter is not provided, notifications will be sent without authentication. |
| chargeback_owner | string | Optional parameter that defines who will be responsible for the transaction chargeback. Accepted values: acquirer or seller Default: acquirer |
{
  "net_value": 1095,
  "amount": 1099,
  "installments": "1",
  "item_id": "a4fe84db-bfaf-4fc0-a345-c6bc53cb5d4a",
  "customer": {
    "name": "John Silva",
    "email": "john@silva.com.br",
    "document_number": "11122233344",
    "phone": {
      "country_code": "+55",
      "area_code": "11",
      "number": "998765432"
    },
    "address": {
      "country": "BR",
      "state": "SP",
      "city": "Sao Paulo",
      "neighborhood": "Downtown",
      "street": "Main Street",
      "number": "123",
      "complement": "Apt 12",
      "zipcode": "01122033"
    }
  },
  "soft_descriptor": "Marlim Store",
  "webhook_url": "https://webhook.site/123-456-789",
  "webhook_auth_token": "your_secret_token",
  "wallet": {
    "payment_type": "GOOGLE_PAY",
    "ott": "81817dc7-1061-4282-8743-b239c8c5a93e",
    "session_id": "886eb109-4149-41c3-8f2f-6c85545bda21"
  }
}
Response Object
{
  "status": "sent",
  "transaction_id": "008ktCGUnBauanAt7sW",
  "date_created": "2026-03-24T17:50:36.481Z",
  "date_updated": "2026-03-24T17:50:36.481Z",
  "net_value": 1000000,
  "amount": 1039501,
  "paid_amount": 0,
  "installments": "1"
}
Payment confirmation will be made via webhook, after the user completes the payment process on the device with the selected wallet.
If any value is passed in the webhook_auth_token parameter, Marlim will send the token to your application using the Authorization: Bearer standard in the request Header:
Authorization: Bearer {webhook_auth_token}
5. ContinuePayment
After sending to start a transaction, in your request callback, the continuePayment() method from the Yuno SDK should be called. This method will require some action, opening the native wallet modals for the user to complete the payment - add card data or select a previously registered card.
Android
continuePayment(
    showPaymentStatus: Boolean, // Optional - Default true
    callbackPaymentState: ((String?) -> Unit)?, // Optional - Default null
)
For the user to completely complete the payment process in SANDBOX, it is necessary that they have a credit card previously registered in their Google account (Google Pay wallet) and that it be a valid card issued by an Issuing Bank, test cards should not be used.
If the user doesn't have a registered card, they will be instructed to add one before continuing with the transaction, but the SDK may return an error due to Google Pay validation. In Marlim tests this flow failed in the sandbox environment.
This process does not occur in PRODUCTION, as Google Pay can validate a card added at the time of purchase.
iOS
Yuno.continuePayment(showPaymentStatus: Bool)
To show your payment status screens, you should send FALSE in showPaymentStatus. Then, get the payment status by callback call.
6. Webhooks
After the user completes the payment on the device, the Wallet sends an update to our Acquirer informing whether the transaction was successful or not. Marlim, in turn, sends the Webhook with transaction data to your servers.
If any value is passed in the webhook_auth_token parameter, Marlim will send the token to your application using the Authorization: Bearer standard in the request Header:
Authorization: Bearer {webhook_auth_token}
Below is the table with the possible current_status values received at webhook_url.
| Status | Meaning |
|---|---|
paid | Transaction paid and successfully captured. |
review | Transaction is under manual review by our specialists. The amount was authorized and reserved on the card, but has not yet been captured. |
refused | Transaction refused by the issuing bank. |
failed | Transaction failed during the capture process at the Acquirer. |
refunded | Transaction refunded. |
chargeback | Transaction suffered a chargeback. |
curl -X POST "https://yourapp.com/order/7ea1a5d4-fd74-41ae-b150-07fa36c260fa/callback" \
-H "Content-Type: application/json" \
-H "User-Agent: Marlim/1.0.0" \
-H "Marlim-Api-Signature: Star98765Wars43210ANewHope1977" \
-d '{
  "event": "transaction_status_changed",
  "transaction_id": "r9U3U1T0ZtBp3EceRfup",
  "current_status": "paid",
  "nsu": "587386",
  "authorization_code": "891482",
  "date_created": "2026-04-13T20:18:56.909Z",
  "date_updated": "2026-04-13T20:18:56.909Z",
  "amount": 10.99,
  "authorized_amount": 1099,
  "paid_amount": 1099,
  "refunded_amount": 0,
  "installments": "4",
  "item_id": "7ea1a5d4-fd74-41ae-b150-07fa36c260fa",
  "payment_method": "credit_card",
  "card_holder_name": null,
  "card_brand": null,
  "card_first_digits": null,
  "card_last_digits": null,
  "acquirer_status_code": "0000"
}'